By default there is toolstar®testLX and toolstar®shredderLX no directly built-in operating system deployment function. However, this function can be retrofitted using the scripts and information listed here. The deployment function uses clonezilla and network drives to restore operating system images of all types to supported devices.
Basic information about deployment with toolstar®LX
In general the process is as follows. Depending on the hardware characteristics of the device, the process may look a little different:
- Start the toolstar®LX stick on the target device
- Preparing the environment using the script on the USB stick
- Execution of toolstar®testLX or toolstar®shredderLX
- Possible query of the target hard drive for the operating system
- Possible query of the source image for this device
- Automatic start of your endurance test for testing and/or erasure
- Automatic loading of the operating system image on the device
- Save all system information, logs and other output
- Shut down the device depending on the condition (failure or pass)
Preparations within your infrastructure
So that the deployment works seamlessly on all devices that you use with toolstar®testLX or toolstar®shredderLX, you must use a suitable device ( Windows desktop, Windows server, Linux desktop or Linux server) set up a network drive. The network drive must be set up so that it can be mounted within a Linux system. The image files will later be located on this network drive. All files must be in the root directory of the network drive. However, you can create a folder called _Backup or something similar in which you can place images that you currently do not want to take into account.
Preparing your toolstar®LX stick
First, please download the .zip package with all the required files here . Then unpack the .zip and copy the contents of the .zip package onto the stick in the testlx directory. Now adjust the information in the process.lua file so that the mount command can mount the network drive you prepared. To do this, you need to change the IP address, share name, username and password. This information can be found at the top of the file with the variables: remoteIpAdress, remoteNetworkPath, remoteUsername, remotePassword and localMountPoint.
Now you can boot from the USB stick and start normally. If there is more than one suitable disk available, you will receive information immediately after starting that you should select a disk as the target. Next, the image is selected (if there is more than 1 image). Now you can start the standard test (a prepared example script including deployment entry) and the last step is to execute the deployment. You can modify the default script in any way or create copies of it to create other test routines to contain the deployment. You can also do the deployment immediately after deleting and only then test the device.
Automatically connect deployment + test or delete process
The downloaded .zip package already contains 2 sample scripts called clonezilla-restore-image.ttsx and clonezilla-create-image.ttsx. Both tests each contain a call to create and restore an image. The two calls can be integrated into other endurance tests at any time. To do this, you simply have to copy the path to the program and the command line and paste them into your own long-term test.
Program: /usr/sbin/ocs-sr
Create: -q2 -j2 -nogui -z1p -i 4096 -fsck-y -senc -p true savedisk %M1 %M19
Restore: -g auto -e1 auto -e2 -a -nogui -batch -r -icds -j2 -k1 -scr -p true restoredisk %M20 %M19
The variables used stand for the following:
%M1: Name of the device, which is the basis for the image name
%M19: Source data carrier (sda, emmc0, nvme0 etc.)
%M20: Name of the image that was selected
Example flow: Creating an image
The scripts used automatically install a version of clonezilla that runs in Linux. This version is used by the scripts. However, you can also start the version manually with the user interface using the clonezilla command on the console and create the image using your other routines without having to use toolstar®.
Alternatively, you can use the ready-made endurance test. This uses the information from your entries to create the image on the network drive. You just have to manually enter a name that begins with the model of the device. However, you can also choose a temporary name and rename the image/folder later on the server.
Example flow: Test, delete and deploy
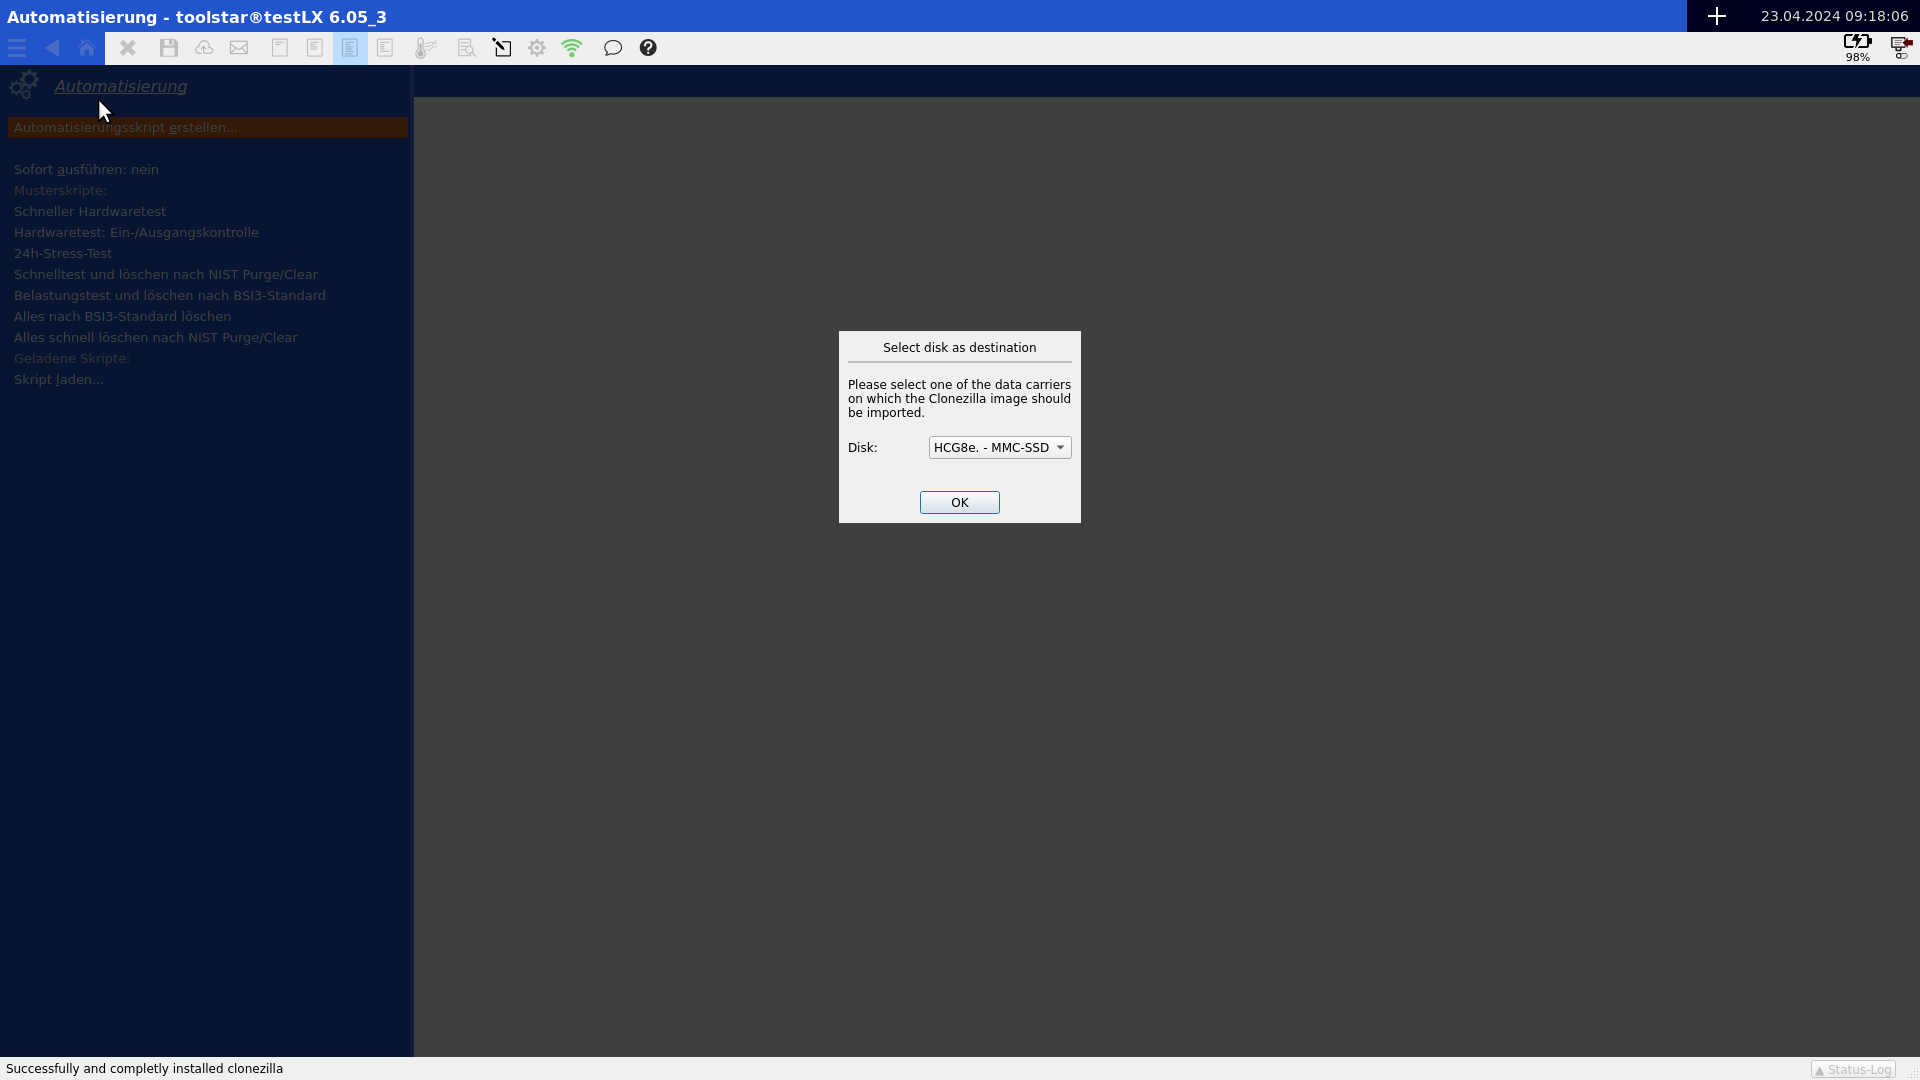
Dialog: Selection of the data medium
Is displayed if:
there is only a single data medium or only a single SSD data medium (regardless of whether it is ATA, NVMe or eMMC)
Not displayed if:
there are multiple SSD disks (whether ATA, NVMe or eMMC) as possible destinations.
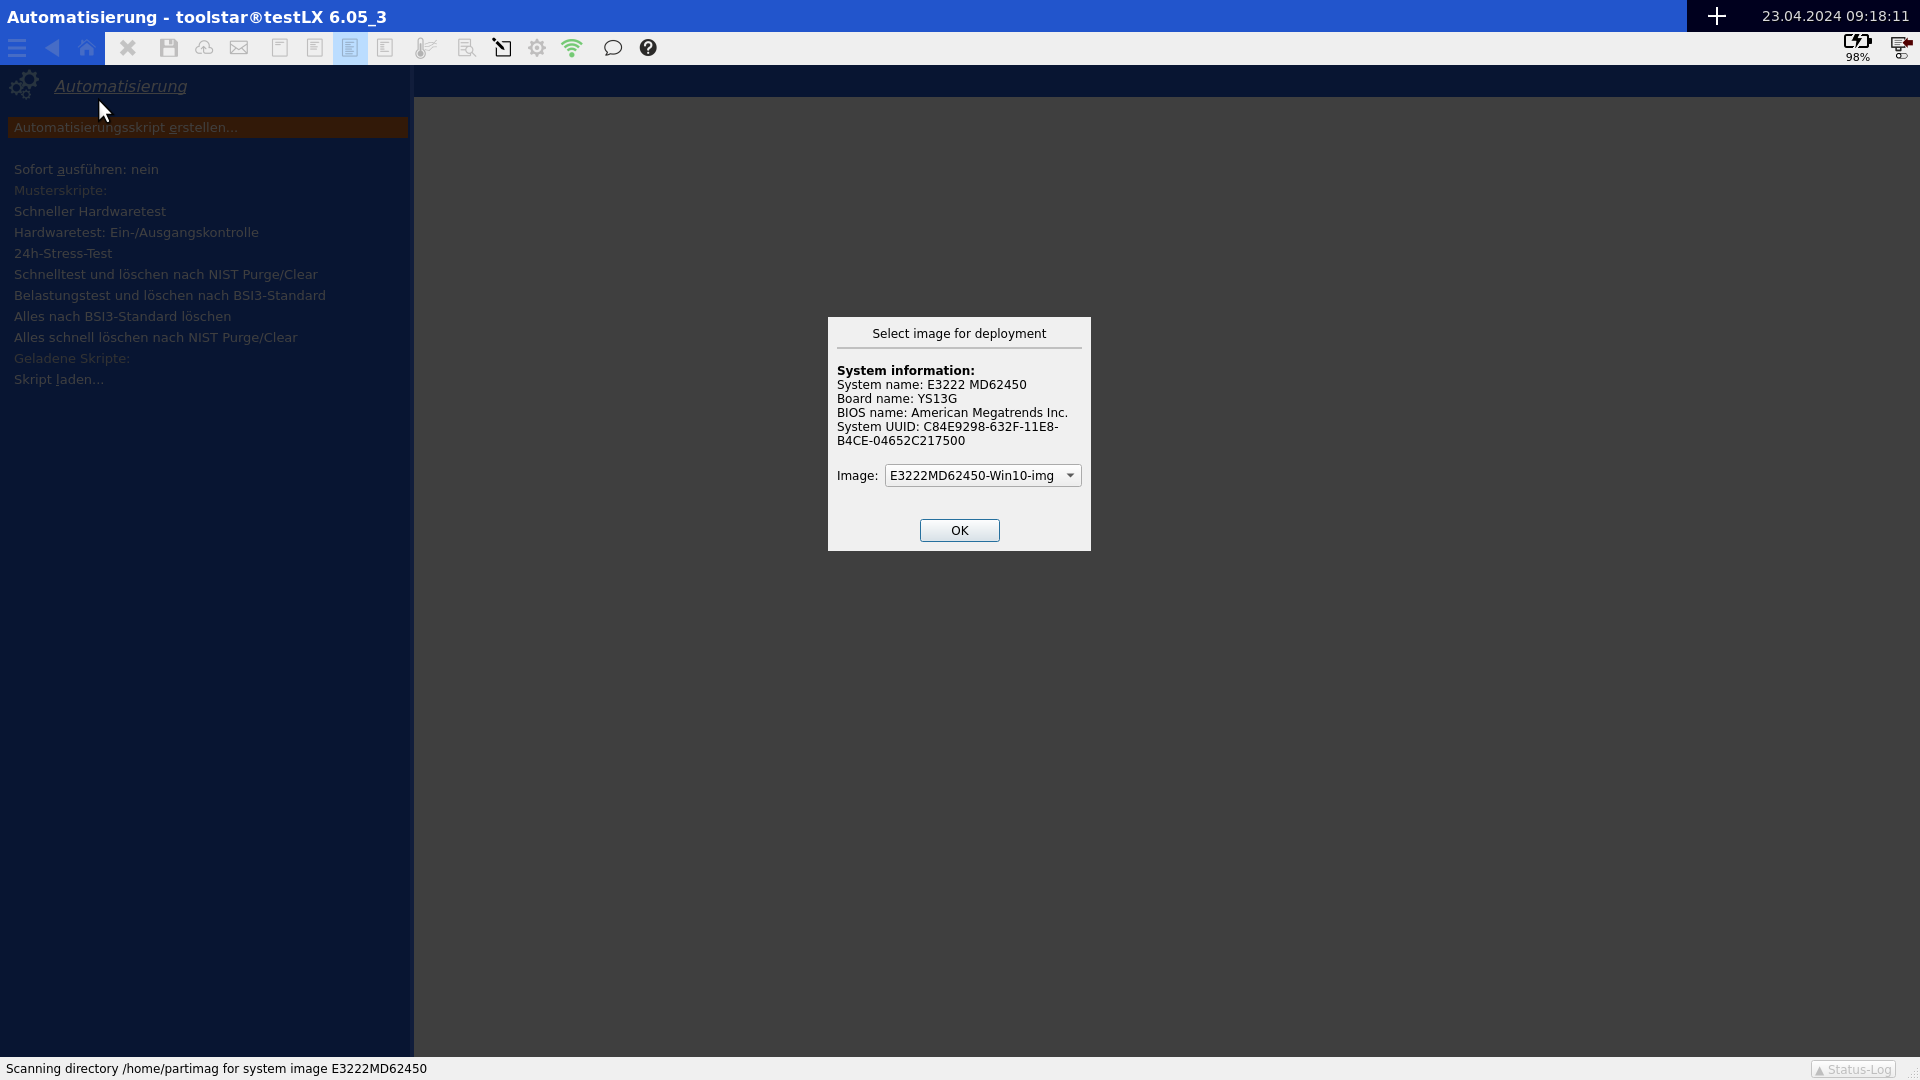
Dialog: Source image selection
Displayed if:
several images match this system. For example, different Windows versions on the server.
Not displayed if:
there is only a single image for this system
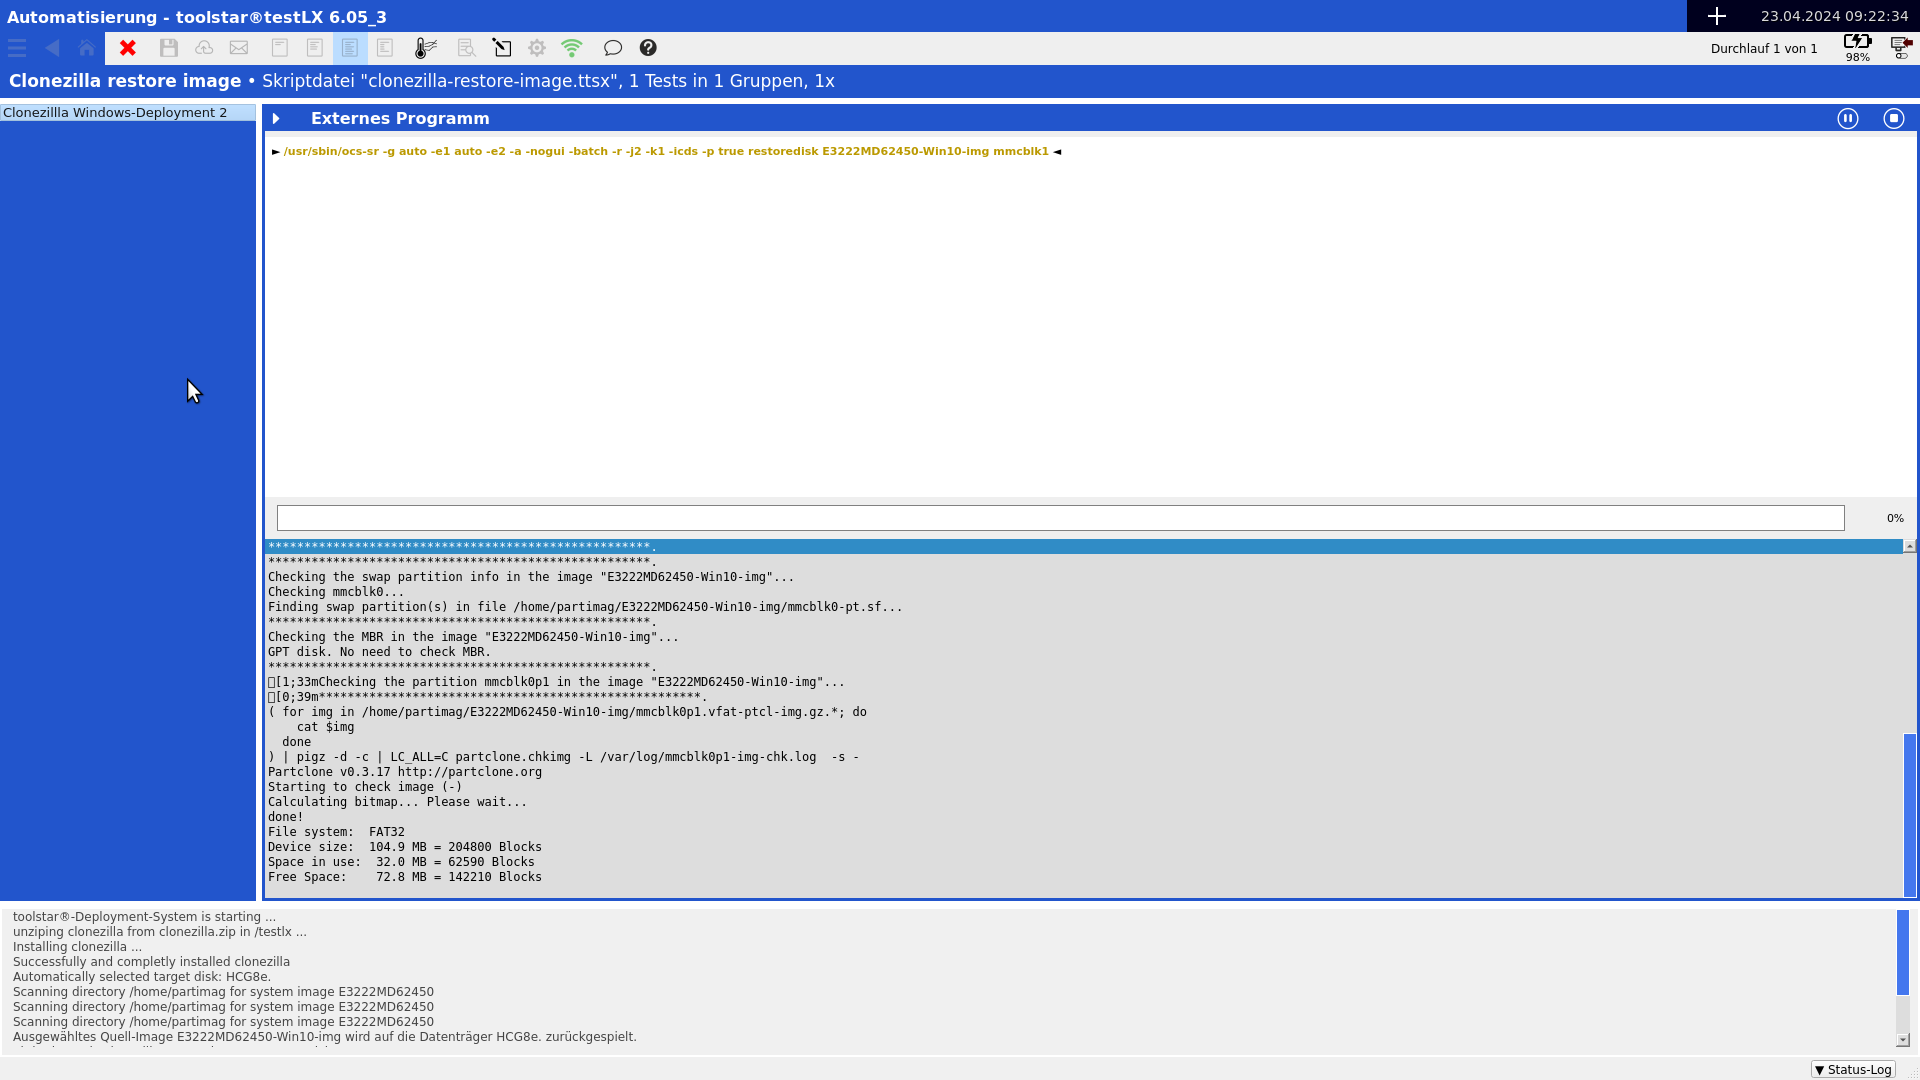
Process of restoring
The process of restoring is handled by calling clonezilla and passing all the appropriate parameters through the scripts. While you are playing back the current status is displayed live on the screen. The process bar is not to be taken into account. If an error occurs during deployment, you will also see an error displayed in the program on the screen and in the reports.
Selection of target disks
It is automatically determined which data carriers are available. If there is only a single ATA or NVMe SSD disk available, it will automatically be selected as the target for the installation. If only one data carrier, regardless of type, is found, it will be selected automatically. If there are several disks of the same type, you will receive a selection dialog with the name, the protocol and whether it is an SSD storage medium.
Image names and similar or identical devices
All images are automatically selected based on the device name. If there are multiple images for a device (for example Windows 10 and Windows 11), you will receive a list of all available images and can select the appropriate one. If you have devices of the same type but with different device names, you can simply copy the images (folders) on the server and rename them manually. This saves you from having to constantly recreate images that actually have the same content.
clonezilla and Windows
Please note that Windows must always be completely shut down (no hibernation, completed NTFS file system) in order to create an image with clonezilla is possible. Otherwise, one or more partitions may not be completely transferred to the operating system image. However, if this happens, you will automatically receive an error in the program (if you use the image function we provide). If you create the images yourself with clonezilla (which is easily possible), you have to check for yourself whether the playback was successful.
clonezilla commandline parameters
The scripts provided already contain the appropriate clonezilla CommandLine parameters tested at toolhouse (for a complete list, see here). However, these may not work perfectly in your environment. If this is the case, you will need to adjust the parameters in the scripts.
Support and help
The scripts and information provided here are for your own use in conjunction with toolstar® testLX or toolstar®shredderLX. If you find an error in the information or scripts, toolhouse will fix it. However, adjustments for your specific case or additional automation in the process of testing and deployment functions are outside of normal support. If you need adjustments in these areas, please contact your responsible processor for an individual offer.