The HDClone CLI toolstar® edition is a version without a graphical user interface, with a focus on automating processes. Due to the lack of a user interface, the program can only be controlled via the CLI interface, but runs completely autonomously at any time and at any time without your interaction. This makes automated backups in the background possible in HDClone quality.
Purpose and scenarios
A classic application would be to secure Windows servers or clients. The automatic conversion of VM-Ware images into smart images or physical hard drives is also a popular function. By using it as a Windows Task you can control the software so that all operations occur on a specific day take place at a certain time. For example, a backup can be started every Tuesday and Thursday at 6:00 p.m. You can find more information in the section “Using the Windows Task Scheduler in the background”.
The CLI parameters and functions
In general, commands are entered according to the pattern hdclone-cl.exe [Mode] [Device indicators…] [Options…].
Mode is the specification of the copy type to be used such as backup, image, bit copy, etc.
Device indicators are information about hard drives or images, which are selected as targets or sources and
Options are special settings that can be set in the respective mode.
Examples of modes:
- backup
- smartimage
- image
- differential or delta
- bitcopy
- bitimage
The –help parameter gives you an overview of all available modes, device indicators and options strong>.
Examples of device indicators:
- –SrcDrv=[number] (Physical disk as source)
- –SrcImg=[File] (source image file name)
- –DstDrv=[number] (Physical disk as destination)
- –DstImg=[File] (file name of the target image)
You can use the listdisks or listvolumes commands to display a list of all available devices.
Examples of options:
- –AppDelay=[seconds] (set waiting time before starting the app)
- –Timeout=[seconds] (set timeout for various operations)
Examples
Here you will find some examples of using the above CLI parameters. All examples assume that the Windows batch file is located directly next to HDClone-CL.exe and that the HDClone CL file is called hdlcone-cl.exe:
Backup:
hdclone-cl.exe backup –srcdrv=0 –dstimg=X:\backup.mfi
Restore a backup:
hdclone-cl.exe restore –srcimg=X:\backup.mfi –dstdrv=0
You will find almost all the functions of the classic HDClone toolstar® edition also in the CLI edition.
Learn more about the available settings
You can use the hdclone-cl.exe to display all settings for each mode (backup, image, etc.) via hdclone-cl.exe [mode] –help. Here is an example excerpt from the help for the backup mode:
QUELLEDATENTRÄGER/ZIELIMAGE:
--SrcDrv=<Zahl>
                    Nummer des zu kopierenden physischen Datenträgers.
--DstImg=<Datei>
                    Pfad und Dateiname und des Zielimages.

OPTIONEN:
--AppDelay=<Sekunden>
                    Wartezeit vor dem Start der App festlegen, damit Symobi alle
                    benötigten Dienste rechtzeitig aktivieren kann.
                    Voreinstellung: 0 Sekunden.
--Timeout=<Sekunden>
                    Festlegung der Dauer für verschiedene Vorgänge, darunter
                    Suche nach Datenträgern oder Aktivierungen. Voreinstellung
                    20 Sekunden.
--OTA, --Interactive
                    Einzelaktivierung durchführen. Durch den Zusatz --
                    Interactive kann eine Aktivierung auch bei fehlender
                    Internetverbindung durchgeführt werden.
--LMAddr=<Adresse>
                    Adresse des Lizenzservers festlegen.
--Shutdown[=<Bedingung>]
                    Nach Beendigung des Vorgangs herunterfahren. Optional: nur
                    wenn Bedingung erfüllt ist. Gültige Werte für Bedingung
                    sind:
                    - NO nicht herunterfahren
                    - always immer herunterfahren
                    - completed herunterfahren, wenn es keinen Abbruch (durch
                    einen nicht behebbaren Fehler) gab
                    - perfect nur herunterfahren, wenn der Vorgang ohne Fehler
                    abgeschlossen werden konnte
--MaxSpeed=<Geschwindigkeit>
                    Gerätegeschwindigkeit begrenzen. Angabe in MB/s
--Report=<Datei>
                    Datei für Abschlussbericht festlegen. Falls keine
                    Erweiterung angegeben wird, wird die Erweiterung .pdf
                    angehängt.
--ReportType=<Typ>
                    Typ der Ausgabedatei, falls nicht durch Erweiterung des
                    Dateinamens bestimmbar. Gültige Werte sind pdf und txt.
--ReportMandatory
                    Falls automatisches Herunterfahren gewählt wurde, kann mit
                    dieser Option eingestellt werden, ob Fehler beim Schreiben
                    des Abschlussberichts das Herunterfahren verhindern oder
                    nicht. Bei der shutdown-Option always hat dies keine
                    Auswirkung.

BACKUP-OPTIONEN:
--Verify=[on|OFF]
                    Nach dem Erstellen der Images Verifikation durchführen.
--ImageType=<Typ>
                    Den Imagetyp setzen (ansonsten aus der Erweiterung
                    bestimmt). Zulässige Imagetypen sind smart bzw. mfi
                    (Standardeinstellung, wenn keine Erweiterung angegeben
                    wurde) oder full (kein SmartImage verwenden).
--Timestamp=[ON|off]
                    Den aktuellen Zeitstempel an den Imagenamen anhängen.
--Smart=[ON|off]
                    SmartImage verwenden. Dadurch werden nur die belegten
                    Bereiche einer Partition kopiert.
--Split=<Größe>[:<Ziffern>]
                    Maximale Größe der einzelnen Dateien der Zieldatei (sofern
                    das Format eine Aufteilung in mehrere Dateien unterstützt)
--Note=<Dateiname>
                    Den Inhalt von Datei als Bemerkung im Image abspeichern.
--Access=<Methoden>
                    Methoden, um einen exklusiven Zugriff auf den
                    Quelldatenträger zu erhalten. Gültige Werte sind:
                    - lock: Exklusiver Zugriff
                    - vss: VSS (= LiveImage/HotCopy)
                    - lock,vss: zuerst exklusiven Lock, dann VSS versuchen
                    - vss,lock: zuerst VSS, dann exklusiven Lock versuchen (
                    Voreinstellung)
                    - shared: kein Lock. Keine Verifikation möglich.
                    WARNUNG: Mit dieser Methode können auf dem Ziel
                    Inkonsistenzen auftreten; diese Inkonsistenzen können zu
                    einem fehlerhaften Ergebnis führen, das ggf. nicht
                    funktionsfähig ist.
--Compress=<Methode>
                    Wenn durch das Imageformat unterstützt, Daten komprimieren.
                    Zulässige Methoden für MFI sind none, quick, strong, normal.
                    Wenn keine Methode angegeben wurde, wird quick verwendet.
--Password[=<Datei>]
                    Die Imagedatei durch ein Passwort schützen, das aus der
                    angegebenen Datei ausgelesen wird. Wenn keine Datei
                    angegeben ist, wird das Passwort über die Eingabe abgefragt.
--PasswordHash[=<Datei>]
                    Die Imagedatei durch ein Passwort schützen. Der Passworthash
                    wird aus der Datei ausgelesen. Wenn keine Datei angegeben
                    ist, wird der Hash über die Eingabe abgefragt.
--PasswordHash=#<Hash>
                    Den Passworthash direkt über die Kommandozeile
                    spezifizieren.
--Encrypt=<Methode>
                    Verschlüsselt das Image. Benötigt die Option --Password oder
                    --PasswordHash. Methode ist entweder aes128 oder aes256.
--Exclude=<Liste>
                    Die folgenden Partitionsnummern nicht klonen. Die
                    Partitionsnummern können durch einen Aufruf des list-
                    Kommandos bestimmt werden. Liste ist eine durch Kommas
                    getrennte Zahlenreihe.
--Include=<Liste>
                    Ausschließlich die folgenden Partitionsnummern sichern. Die
                    Partitionsnummern können durch einen Aufruf des list-
                    Kommandos bestimmt werden. Liste ist eine durch Kommas
                    getrennte Zahlenreihe.
--DataSelect=<Partition>:<Datei>[,<Datei>...]
                    Dateiname der Liste der zu löschenden Dateien bevor die
                    Kopie/das Image erzeugt wird. Partition kann ausgelassen
                    werden wenn eine Liste für alle Partitionen gelten soll.
--SkipFiles=<Methode>
                    Angeben, welche Methode zum Dateiausschluss von der Quelle
                    verwendet wird. Gültige Methoden sind:
                    - none: Alle Dateien kopieren
                    - minimum: Nur ein Minimalset von Dateien nicht kopieren
                    - known: Nur ausgewählte Dateien aus der vom Betriebssystem
                    vorgegebene Liste von Dateien nicht kopieren.
                    - system: Vom Betriebssystem vorgegebene Liste von Dateien
                    nicht kopieren.
Many of the options apply to all modes. However, depending on the modes (image / copy), some options differ. Also, not all copy modes have the same options. There is a big difference, for example, between Smart and Bit-Copy.
Use via the Windows Task Scheduler in the background
You can either run the batch file manually or control it via a Windows task for automation. You can create these using task planning . Here you will find a sample setting:
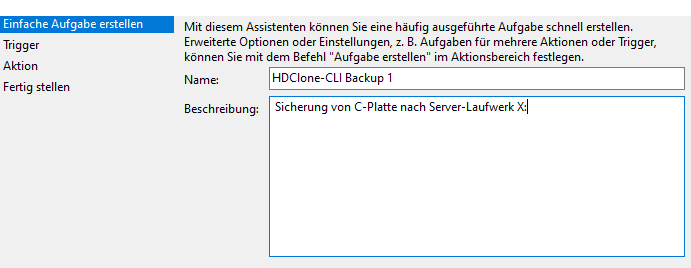
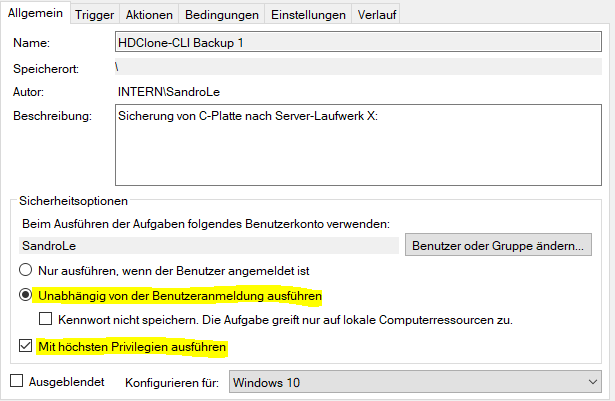
1. Create a “Simple Task”. Name and description are used to display in the overview of all tasks and as a reference in the Windows event log in the event of errors. If you create different processes, you can easily distinguish between them:
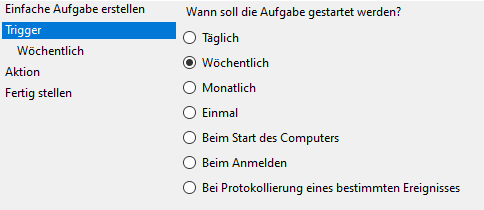
2. Select Weekly as the frequency. Of course, you can also select a different frequency if it suits your usage scenario better
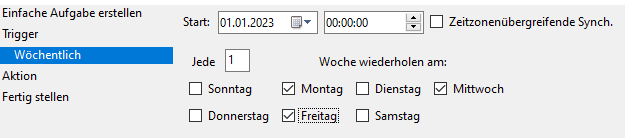
3. Set the day and time the task should run. Here it is specified that the task will run from January 1st, 2023 and always at 00:00:00. The task runs every week on Monday, Wednesday and Friday. Settings vary based on what you selected in point 2. In some cases this dialog may not even be displayed.
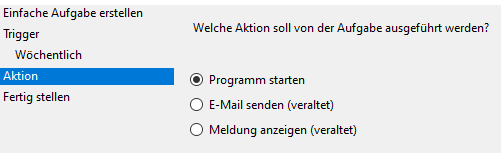
4. Select Start program as Action.
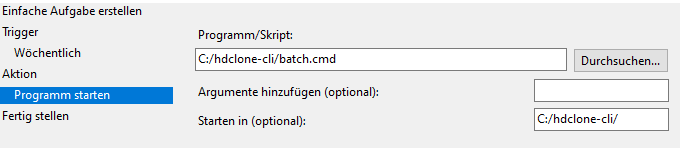
5. Under Script enter the path to the created batch script and under Start set the directory in which the batch script is located. Starting in ensures that the HDClone CL file is found.
6. Select that you want to open properties when finished and then click fertig stellen.
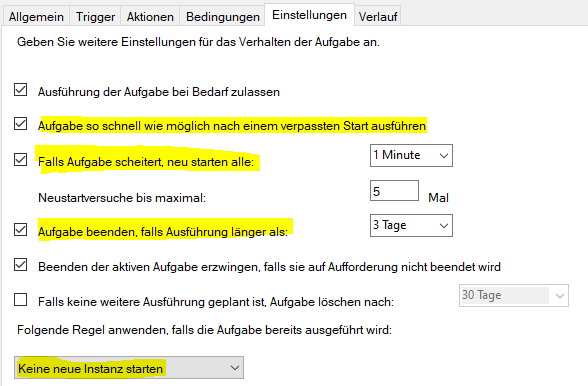
7. Then set the following settings in the advanced settings:
Licensing and acquisition of the software
Licensing
All HDClone-CL editions are licensed via a USB stick. This means that the licenses can be changed flexibly between computers. The stick must be connected to the device running HDClone CL.
Acquisition:
The software is only available directly via telephone sales and adapts to individual requirements. There is therefore no standard price scale. For further information, please contact your sales representative at 08441 5044 0 or via info@toolhouse.de.