Why do the new erasing methods exist?
The new erasure standards were installed by toolhouse in order to further increase the security of the erasure process and also to offer you the opportunity to create a NIST to implement a compliant erasure process in the company. New methods include supporting Sanitize and NVMe format features.
DCO - Device Configuration Overlay
Almost all conventional hard drives (HDD, SSD, NVMe, etc.) have a DCO . This regulates how the hard drive reports to the controller and which data area is accessible. For example, 500GB hard drives could be turned into 450GB hard drives or, for many different hard drive models and types, the number of available sectors could be set exactly to 1,000,000. When it comes to erasing, the problem arises that these settings need to be reset so that the entire hard drive is accessible and can be erased. In the new version, this area has been completely revised and made more compatible and reliable.
NIST - National Institute of Standards and Technology
The NIST is a federal agency of the United States States of America. This institute defines, among other things, erasure standards and processes. The standards and procedures defined there are then taken up and installed by the manufacturers of different hard drives. Depending on the model, there are one or more ways to safely delete the medium. Overwriting the data is just part of the process and is available with every conventional hard drive. The procedures and standards defined by NIST are usually built into the firmware of the hard drive and can be activated automatically with our software.
The new methods in detail
HDD+SSD: Block Erase
By definition, this standard overwrites all areas of the disk with a defined pattern. The pattern may differ per disk and firmware.
HDD+SSD: Crypto Erase
This standard erases the security key required to encrypt and decrypt data. Only possible for disks with active hardware encryption.
HDD+SSD: Overwrite
By definition, this standard overwrites all areas of the disk with a defined pattern. The pattern may differ per disk and firmware.
NVMe: NVMe Format (Crypto Erase)
This standard erases the security key required to encrypt and decrypt data. Only possible for disks with active hardware encryption.
NVMe: NVMe Format (User Data Erase)
By definition, this standard overwrites all areas of the disk with a defined pattern. The pattern may differ per disk and firmware.
The new configuration interface
With the introduction of the new erasure standards (see section “The new methods in detail”), the old interface for configuring the process was no longer sufficient. A new interface had to be created that offers the freedom to combine the new and existing erasure standards in any order. For this purpose, the “Custom” item in the program has been completely revised and adapted.
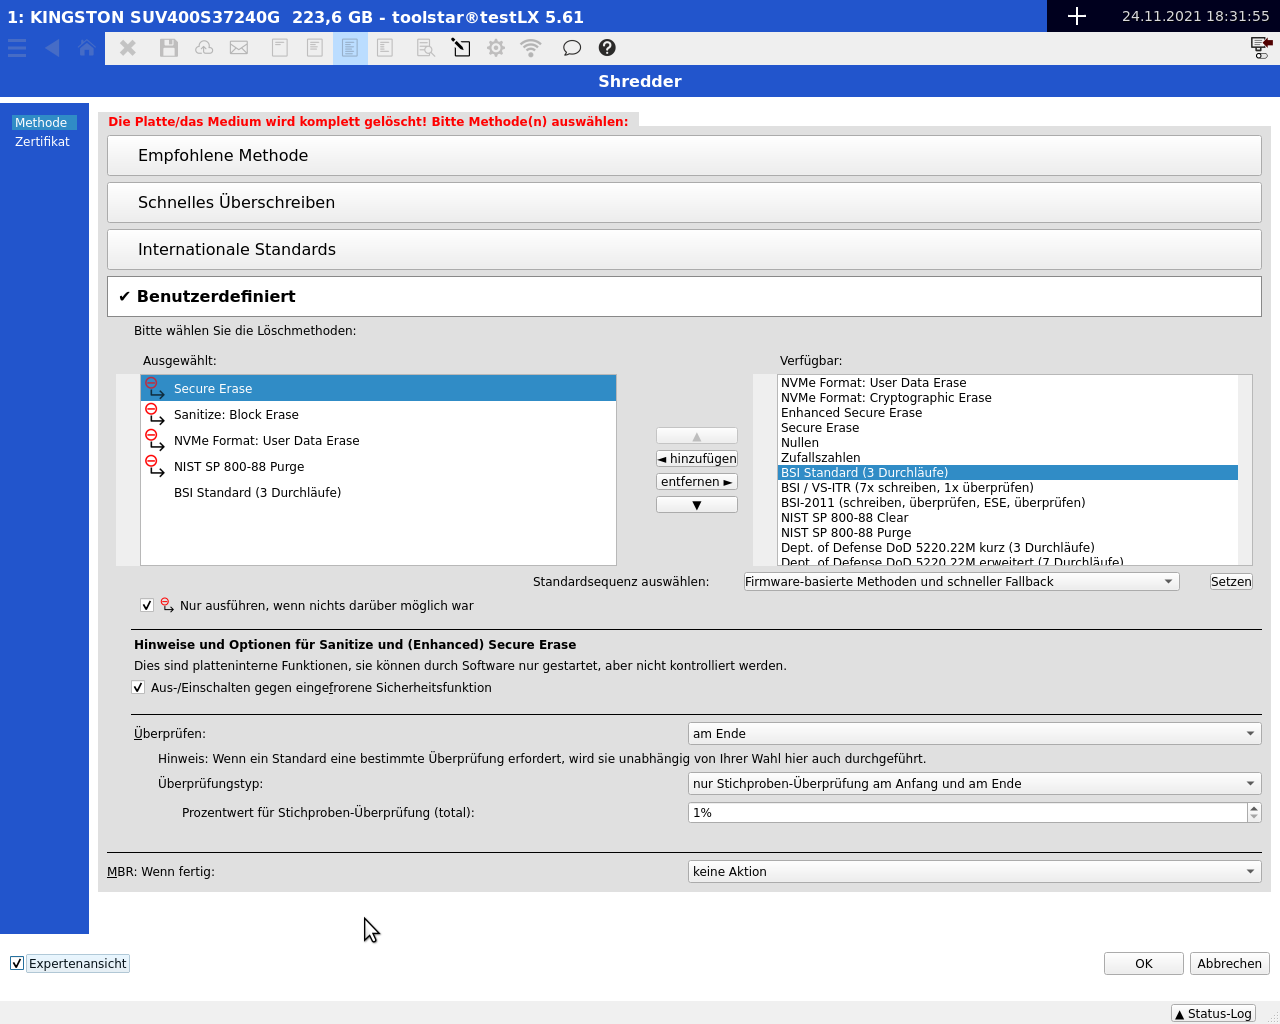
In the picture on the left you can see the new interface. You can enlarge the image by clicking on it.
Where can I find the new interface?
You can find the new interface within the script configuration under Automation on the quick start page. Below the “Shredder” point. The new interface completely replaces the old interface.
How do I use the new interface?
The new interface is similar to the test configuration. On the right you will find a list of all available firmware-based standards as well as international standards and you can run them in any order depending on them.
Modifier: Execute only if nothing else was possible
With this modifier you can control in the list whether the methods below should still be executed, even if a method above was already possible.
The individual options in detail:
(Listed in order, starting from the top, within the “Custom” dialog)
- Selected/Available erasure methods and standards
The new interface offers you the opportunity to combine all erasure standards freely and flexibly. To do this, you can simply double-click on an entry on the right and add it to the selected list. All selected functions are then processed from top to bottom. The setting to “Only execute if nothing was possible” is observed. - Only execute if nothing was possible
You can set the option individually for each entry within the “Selected” list. This means that marked entries are only executed if nothing was possible. An example:Only execute if nothing was possible Erase method YES Enhanced Secure Erase YES Secure Erase NO BSI-Standard 3x With this setting Enhanced Secure Erase would be executed. If that was possible, BSI 3 will be executed immediately. However, if Enhanced Secure Erase is not possible, then SecureErase will be executed. BSI3 is always executed in this setting. It doesn't matter whether one of the above functions is supported by the medium or not.
- Turn off and on to prevent frozen security features
You should always select this option. You can find more information in our Knowledgebase article. - Check
This setting is optional for most erasure standards. By default a simple 1% check is performed. The verification reads the written pattern by reading specific sectors after the last erase operation. The check is only possible for known writing patterns. - Review Type
You have 3 choices for the review type. Whole medium, sample at the beginning and end, or sample evenly distributed. - Percentage value for sample
The percentage value set here only applies to the Sample at the beginning and end and Sample evenly distributed options. - MBR: When finished
Here you can set whether the MBR should be overwritten with zeros at the end, a generic boot code should be set or no action should be carried out. The MBR is overwritten and deleted during the classic erasure anyway. Our recommendation is not to select an action here. Because then you have a consistent pattern across the entire medium. An installation of an operating system such as Windows always writes a new MBR in sector 0.
Some options may not be visible until you activate the expert view at the bottom left.
The erasure methods and settings in detail
The media verification settings apply generally and are independent of the erasure method selected. The check can only take place if a known pattern was written to the hard drive in the last run. Additionally, verification is optional and not required. However, exceptions are various international standards that require review. In this case, the check cannot be deselected and is not optional and will be carried out in any case.
Review types:
- Check entire medium:
Here the entire medium is read and verified again from 0-100%. The percentage value setting is ignored here. - Sampling: Evenly distributed:
Depending on the setting of the percentage value, sector blocks are read evenly distributed across the entire medium and the content is verified. - Sampling: At the beginning and at the end:
Depending on the setting of the percentage value, the set percentage is read and verified at the beginning and at the end.
Percentage value for sample:
The percentage value set here affects several settings under the “Review type” item. Depending on the selection, the percentage value is entered into the certificate together with the selected verification.
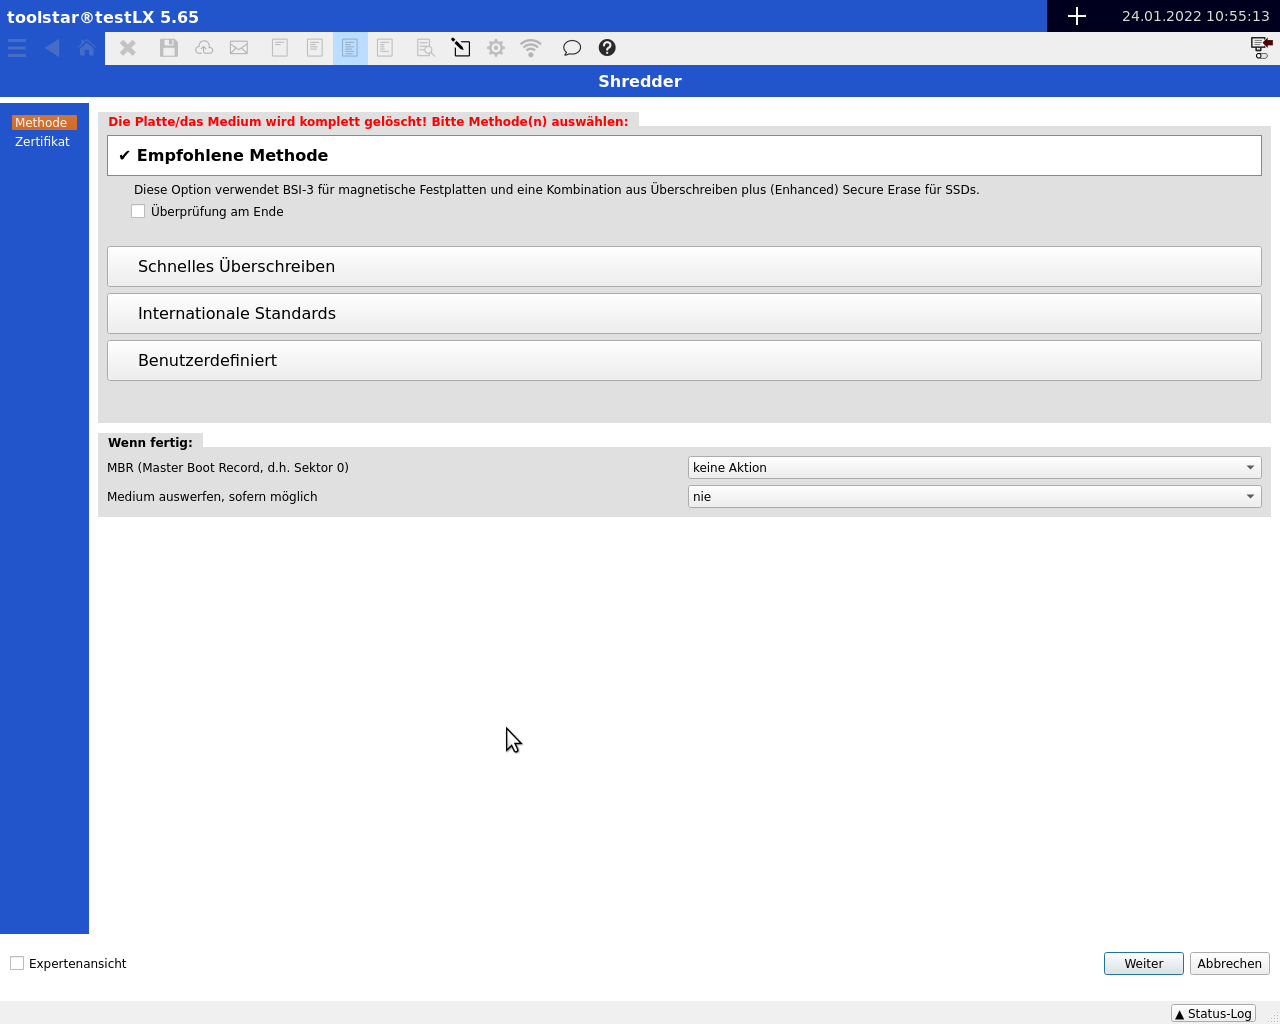
- The Recommended Method
Depending on the hard drive type detected, the “Recommended Method” erases the media either with BSI-3 (HDD, USB stick, USB-HDD, etc.) or with a combination of overwriting (random numbers) and SecureErase or Enh. SecureErase.
Advantage: You don't have to deal with the settings. The program takes care of the adaptation to the disk type for you.
Disadvantage: No international standard is used for SSDs, but random numbers are used as overwriting patterns. Depending on the order, this may be insufficient. Although this process is gentler on SSDs than many overwriting processes.
Note: The erasure certificate states either HDD shredder or SSD shredder as the erasure method. Unlike manual selection, the individual erasure steps are not displayed in detail. - Fast overwriting
With fast overwriting, the hard drive is overwritten exactly once with zeros. This is acceptable for internal erasure procedures but not for external customer media. The customer data is completely deleted, but this procedure leaves you legally vulnerable. - International Standards
Here you will find the classic overwriting patterns. The most important are the first two BSI-3 and BSI-VS 7x. With these two standards you are on the safe side in Germany. Depending on the customer's order description, you must choose a suitable international standard. If you have not received any direct specifications from the customer, then you are on the safe side with BSI-3. - Custom
Here you can put together exactly how you want to delete. With “Custom” it is also possible to combine firmware-based erasure methods with international standard methods. For more information, see “The New Configuration Interface” above.
All optional verification settings are also written to the erasure certificate and are visible to you and your customer.
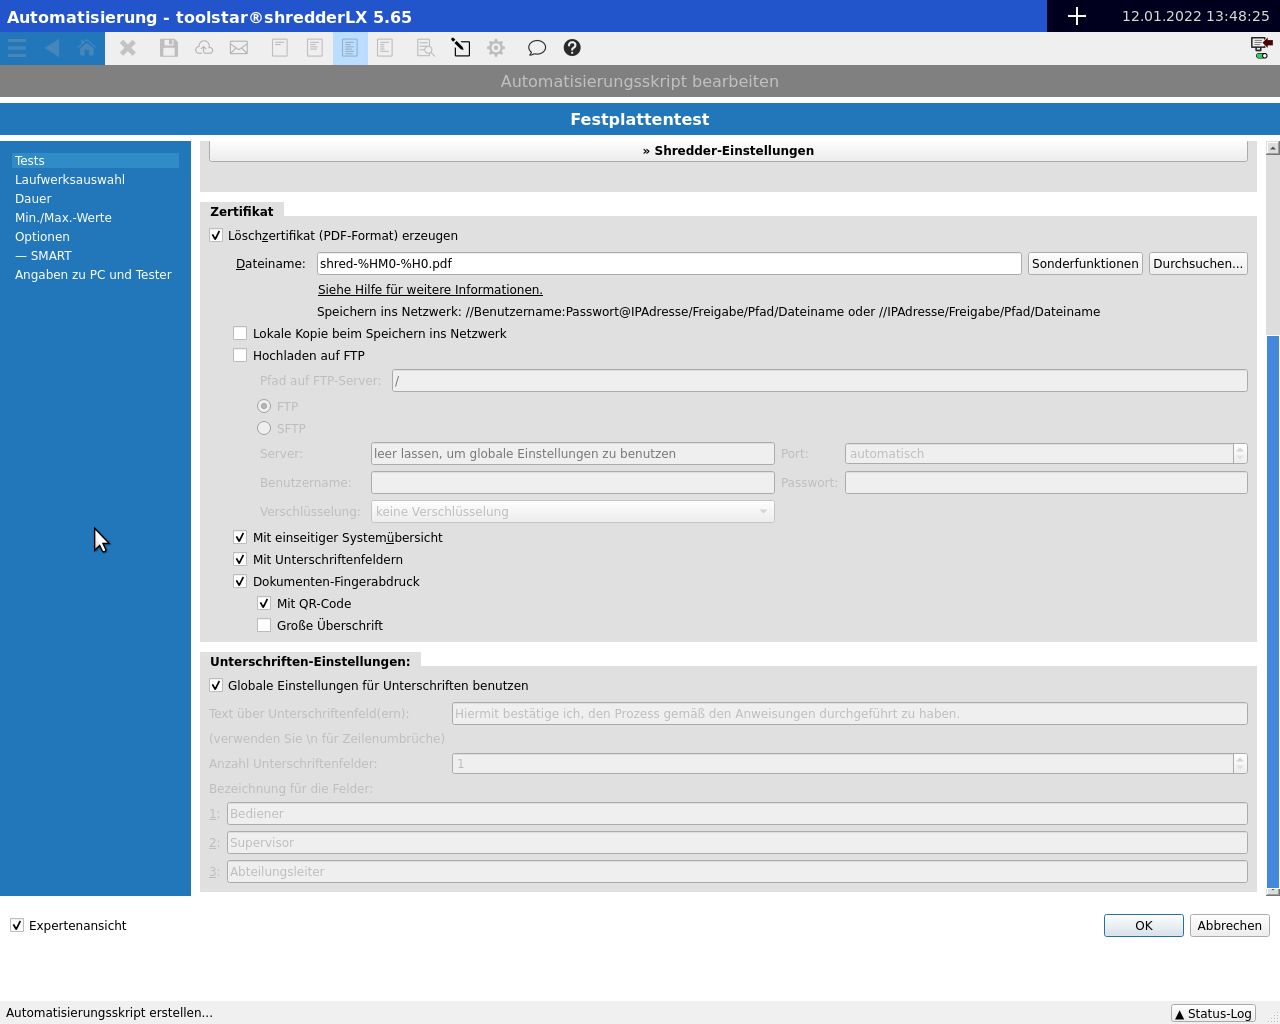
The certificate settings
The creation of erasure certificates is always enabled by default. Unlike the erasure logs, the erasure certificates are your proof of successful erasure and should always be archived. Delete logs always describe the entire process and Delete certificates describe the process per hard drive. For example, if you delete 4 media, then you will receive a erasure report (with 4 media and their information) and 4 erasure certificates (one document for each medium with the information for exactly this one medium).
Where can I find the certificate settings?
The certificate settings are either on the left side of the window under Certificate or in the long-term test as a dialog under the “Shredder Settings” button.
Should I save and archive a certificate?
Yes, this should always be saved and archived. Without a erasure certificate, you have no proof of erasure.
Where should certificates be stored?
By default, the certificates are saved on the USB stick. However, these documents are best stored on a medium intended for long-term storage. A server share works best for this. You can also save there automatically from within the program. Optionally and additionally, an email or FTP upload is also possible.
The individual options in detail:
(Listed in order, starting from the top, within the “Certificate” dialog)
- Generate erasure certificate (PDF format).
This option should always be selected. Without a erasure certificate, you have no proof of successful erasure. - Filename
The file name of the document. You can also enter a path to a network share here: //User:Password@Server-IP/Share/Folder/shred.pdf
Within the file name you can also use the special functions such as %S (device serial number), %HM0 (erased disk model), etc. - Local copy when saving to the network
If you save to the network, you can always save a copy in the testlx directory on the stick by setting this checkbox. - Upload to FTP server
Here you can specify an FTP server and also select the communication protocol to be used. The selected protocol must match your server settings. Depending on the server configuration, you may still have to enter access data and select an encryption to use. - With a one-page system overview
Should a system overview (very short, maximum 1 page, usually smaller) be added to the erasure certificate? We recommend activating this option when deleting customer hard drives in customer devices. If you delete individual hard drives within your own devices, you can also deselect this option. - With signature fields
The signature fields are printed at the bottom of the certificate and can be signed manually if printed. You can define between 1 and 3 signature fields. - Document fingerprint
The document fingerprint is a QR code that is printed at the bottom of a certificate. This can be scanned with one hand and then validated on toolhouse.de. IMPORTANT: The data will only be sent to toolhouse if the QR code is scanned or clicked. - Signature Settings
Here you can define a text that will be displayed directly above the signature fields and also specify how many of the signature fields should be displayed. You can also set these settings globally in General Settings. Then the settings apply to each script, unless you override them at this position per script. - Names for the fields
You can give each signature field its own name such as customer, managing director, etc.
Some options may not be visible until you activate the expert view at the bottom left.