What is toolstar®recoveryPRO?
toolstar®recoveryPRO is an affordable data recovery software from toolhouse for IT service providers and anyone who is dealing with lost data has to do. With toolstar®recoveryPRO you can restore files and folders deleted from all Windows file systems. Depending on the logical damage, entire directory structures with files and subfolders can also be restored. toolstar®recoveryPRO always tries to record all information under all circumstances. In addition to the file and folder names, this also includes meta data such as the location where an image was taken or notes as well as attributes that were set by the owner via Windows Explorer.
What is toolstar®driveREPAIR Modul?
The toolstar®driveREPAIR module is an optional add-on for toolstar®recoveryPRO, with which you can restore deleted or damaged partition tables. You have the option of converting all existing or found partitions that toolstar®recoveryPRO shows you into a new one MBR or GPT entry. This function makes it possible to make defective Windows installations bootable again and avoid data recovery.
NOTE: toolstar®driveREPAIR works on the defective disk and also writes to it . Backup copies of the boot sector and the partition table are created. However, it is still recommended to create a backup copy beforehand. The copy must under all circumstances be a 1:1 (bit copy) of the original hard drive. We recommend the program HDClone®toolstar-Edition.
The partition scan with toolstar®recoveryPRO
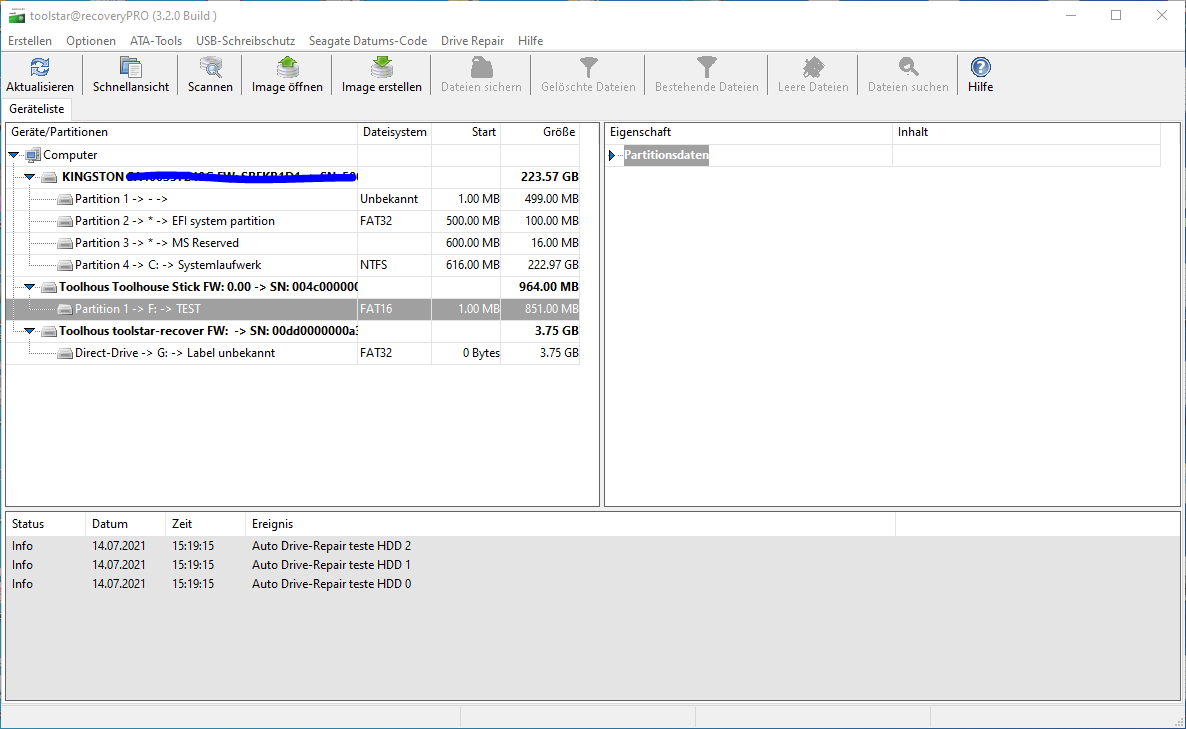
The partition scan searches in the existing MBR and GPT areas by partitions and also on the entire hard drive. If a partition is recognized, it will be displayed in the device overview after the scan.
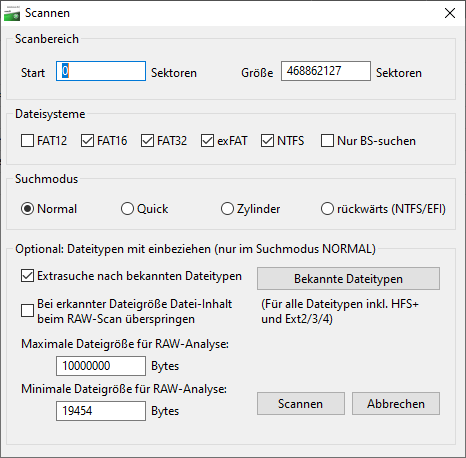
In the picture on the left you can see the scan dialog with all the settings. At the top you specify which area of the hard drive should be searched. The default is 100% search.
You can then specify which file systems should be found. Depending on the partitions found, they may or may not be displayed in the overview after the scan
In the search mode you can choose between normal (searches the entire hard drive from 0% -> 100%), quick (searches only in places where partition signatures are known), cylinder (searches only at cylinder boundaries) and reverse (searches the hard drive from 100% -> 0%).
In the next section you can specify whether the RAW file scan should run and if so, for which file types. You can also specify what the maximum RAW file size should be. It can happen that it is not recognized when a file ends. The maximum size limits this area. Otherwise you might find an image that is as large as the entire hard drive.
The RAW-File-Scan with toolstar®recoveryPRO
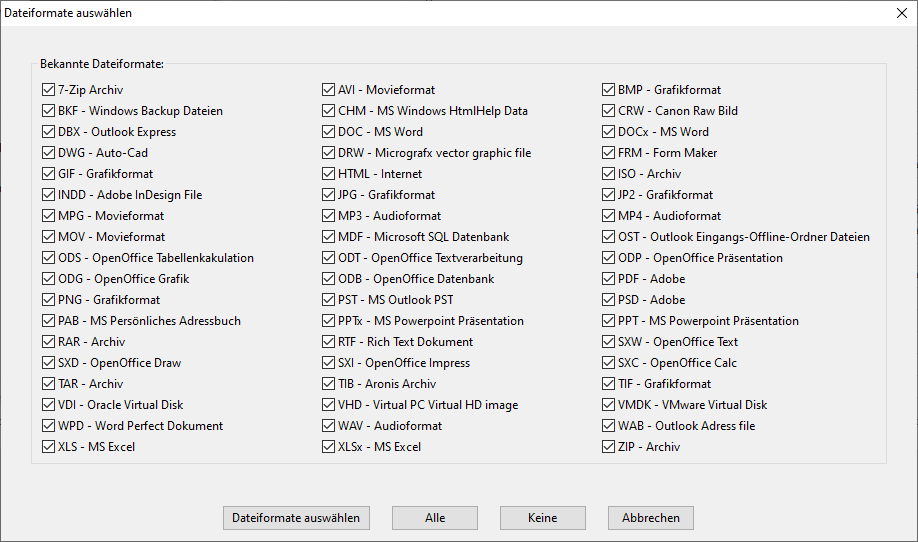
The RAW file scan scans the entire hard drive from 0% - 100% for signatures of known file types. In the image on the right you will find a list of all integrated file types. Because RAW file scanning searches outside partition and file system boundaries, found files are sorted by file type and no meta information or file names are available.
The advantage of RAW file scanning is that you can also scan severely damaged Windows-File systems and unknown file systems (Linux, Mac, Solaris, proprietary, etc.). This can often be used to restore files that were thought to be completely lost.
You set the options for the file types in the scan dialog (see image above).
5 different case studies
Data was deleted in an intact partition
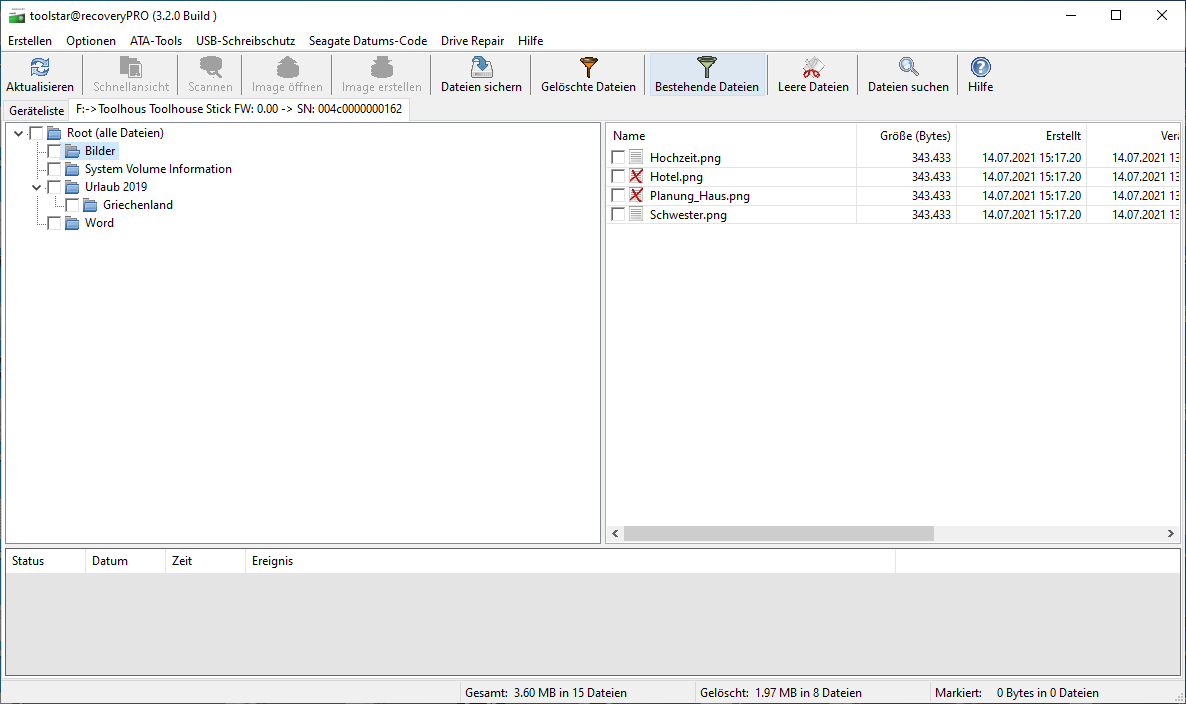
If data was simply deleted (too large for the trash or with Shift+Delete), then you can easily find it by scanning the respective partition. To do this, simply double-click on the partition. After double-clicking, the entire partition is read by the program and a virtual tree is created that contains all existing and deleted files. You can then filter and search this in the next step. Depending on how large the partition is, reading takes longer or less time. In most cases the time is between 3 and 6 minutes.
After reading, the directory tree will be displayed to you. All folders that have been deleted or contain deleted files will be marked with a red “X”. Any file that has been deleted will also be marked with it. The display can be adjusted using the filters at the top right.
This is helpful to recover all data that has been deleted. The customer often only wants data back that has been deleted and not a mix of deleted and existing files.
Once you have identified and marked all folders and files to be restored, you can restore the marked items to another disk by clicking on “Back up files”.
When restoring, pay attention to toolstar®recoveryPRO automatically adjusts the length of the file paths and shortens them if necessary. It is still recommended that the restore to another disk takes place in the root directory if possible. So, for example, under E: and not under E:/Customers/Example/Backup/2021/. Network drives are also a possible target.
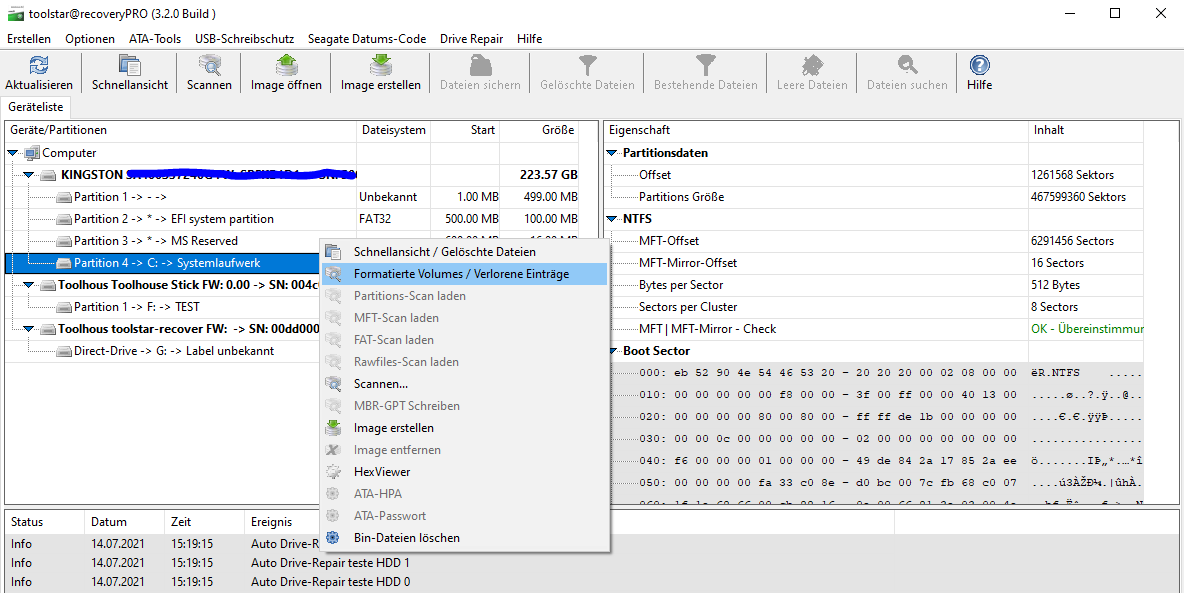
A partition was formatted but not overwritten
It can happen that partitions are accidentally formatted. For this case there is a special scan “Formatted Volumes / Lost Entries”. You can run this scan by right-clicking on the affected partition. This specifically searches for file tables in this partition that are not related to the current table. This often allows you to restore almost everything that was there before formatting. So complete directory trees with files.
Especially in this incident, it is important that the hard drive is no longer used. When it comes to data recovery, the following principle always applies: If something has happened, switch off the device immediately and stop using it. As you use it, more and more data will be overwritten over time. This data is then irretrievably lost.
A partition was erased but not overwritten
If a partition has been deleted by the customer, it can be recovered using the normal scan of toolstar®recoveryPRO find. The partition found will be displayed in the overview after the scan. In this overview you can simply double-click on the partition. This is then read in as described under “Data was deleted in an intact partition”. You can then use this method to restore all folders, subfolders and files on another hard drive.
The second option would be to put the found partition with all existing partitions back in with toolstar®driveREPAIR a new MBR- or GPT area. This would mean that the deleted partition would be accessible again normally under Windows. Provided the data within the partition has not been corrupted.
If you use toolstar®driveREPAIR to create a Window system partition such as C: restore, bootability may be restored. This may make it possible to correct a new installation that has been started accidentally. In addition, the customer not only receives his data back, but also all Windows settings.
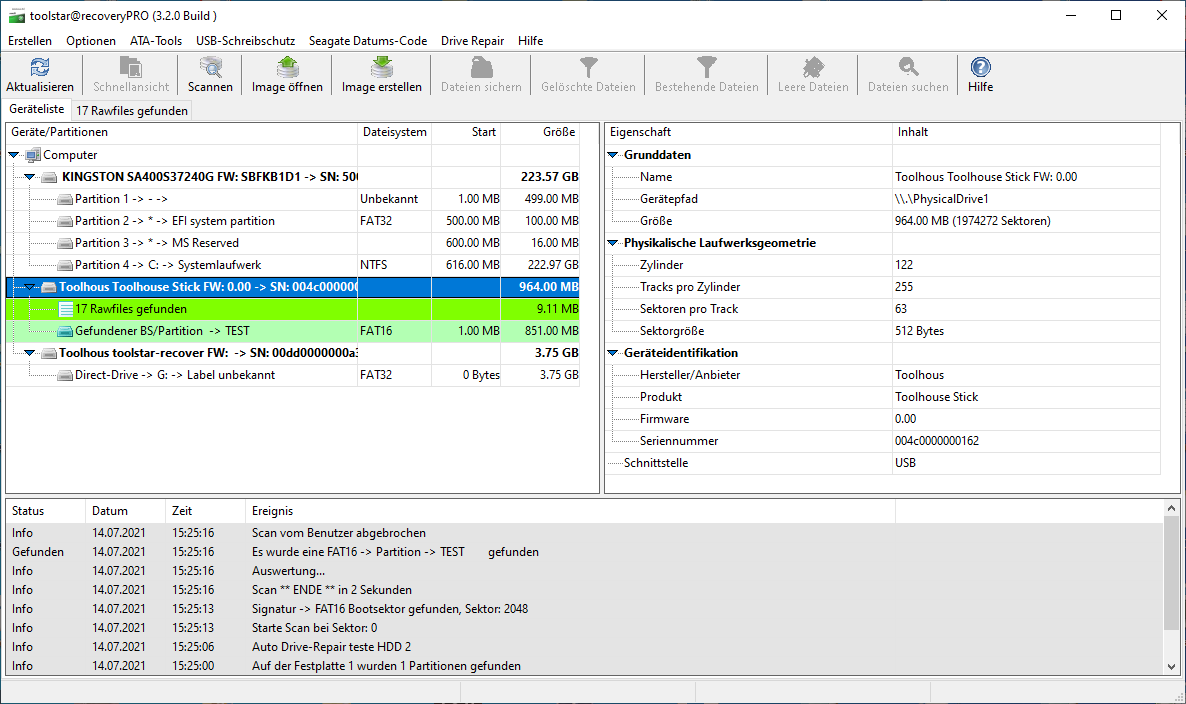
The scan does not find any partitions
It can happen that only RAW files are found on a hard drive, but not a single partition is displayed. This may be because the hard drive only had one large partition and its signature was completely overwritten. In this case you can only access the RAW files found.
However, in most cases signatures are found. Depending on the damage and age, you may or may not be able to read them. If too much has been overwritten, a partition can no longer be read correctly and the file list is lost.
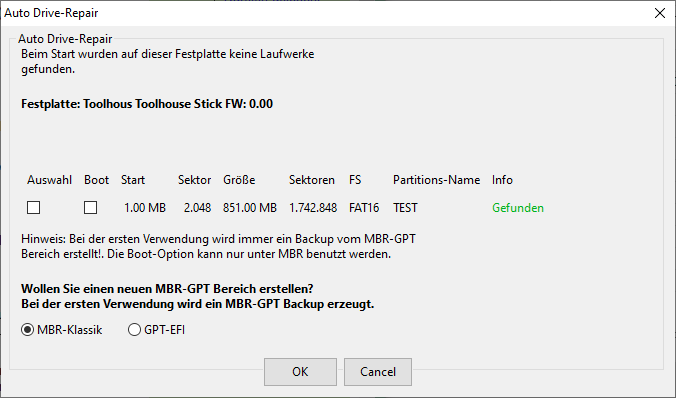
Automatic repair with toolstar®driveREPAIR
When starting the application, the toolstar®driveREPAIR module checks whether one of the connected Disk a partition has been marked as deleted and offers a restore.
In the pop-up you then have the option to select the partitions found. The partitions available for selection are a mix of existing (not deleted) and deleted partitions. With these partitions you can then create a completely new MBR- or Create GPT area. You can also choose which of the partitions should be marked as bootable.
A backup of the existing MBR- or GPT area, but we still recommend not restoring to the original medium, but to a previously created backup.
With automatic repair, you will only receive information in the existing MBR- or GPT area displays deleted partitions. However, later in the program you can also restore deleted partitions that are found and which no longer have a reference to the existing MBR or . GPT area.
On Windows, the bootable partition is not the EFI partition, but C:
Sample data recovery process
The customer is asked what happened
The first thing you should do is ask your customers what happened to the hard drive. Based on the answer, you can often determine how to use toolstar®recoveryPRO and possibly toolstar®driveREPAIR needs to be worked on. As a reference, you can use the case studies as described above.
The hard drive is checked for physical damage
Next, you should conduct your own inspection and use the customer's response from Step 1 to determine whether the hard drive may have been physically damaged. Depending on the diagnosis, special attention must be paid to the hard drive during the copying step. Cooling by fans or special cooling pads may be necessary.
The data on your own backup disk will be overwritten/deleted
Afterwards, if you haven't already done so, you should delete the data on your own backup disk using a data erasure program overwrite. A simple run with, for example, ZEROS is sufficient. This process ensures that no data from a previous case is mixed with the current data recovery case. This can distort the result and lead to a serious breach of data protection.
Make a BIT copy of the customer data
The next step should be to copy the customer's hard drive so that the customer's original data is not further damaged. This is necessary in every case and not only if the hard drive is physically damaged. You must ensure that you make a 1:1 copy (BIT copy). Only then will deleted data be copied and not just the files found in the file system. We recommend HDClone. Any other copy program with a bit copy function will also work.
Data recovery with toolstar®recoveryPRO
Next, you can carry out the actual data recovery with toolstar®recoveryPRO. To help you, you can use the case studies from above and the help integrated into the program. Of course, you can also call our support department at any time at 08441 5044-27 or send us an email at support@toolhouse.de inquire.
The saved data is handed over to the customer
After data recovery, you can hand over the secured data to the customer. Depending on what happened to the customer's original hard drive (logical or physical defect), now would be a good time to offer a new hard drive. Of course, this conversation can also be clarified under Point 1 “Conversation with the customer”.
Data on your own backup disk will be overwritten/deleted
Immediately after completing the job, you should completely delete the data on the hard drive, as in point 3. This minimizes the risk of data from different processes getting mixed up.